Accessories & Cables
Evaluation Kit for the Harrier 18x HDMI 4K Camera
Part Number: AS-CAM-18HDMI4K-EVAL-A
Features
- For evaluation of the Harrier 18x AF-Zoom HDMI 4K Camera.
- Includes an evaluation board, power supply and cables required for fast setup.
- Immediate connection to analog and HDMI video outputs.
- VISCA™ camera control over USB-UART.
- Navigation switch for zoom/focus and on screen menu operation.
- Power switch and LED.
The Evaluation Kit for the Harrier 18x HDMI 4K Camera allows rapid evaluation of the Harrier 18x AF-Zoom HDMI 4K Camera. It contains an evaluation board, power supply, KEL cable, FFC cable, USB cable and mounting screws/pillars.
The Evaluation Board provides the camera with power and VISCA communication over USB. It gives easy access to HDMI and analog video outputs and push-button control of zoom/focus and the on screen menu system.
Note: The evaluation kit does not include the camera, which needs to be ordered separately.
Evaluation Kit for the Harrier 18x HDMI 4K Camera
| Kit Contents: |
Please note: Camera not included. |
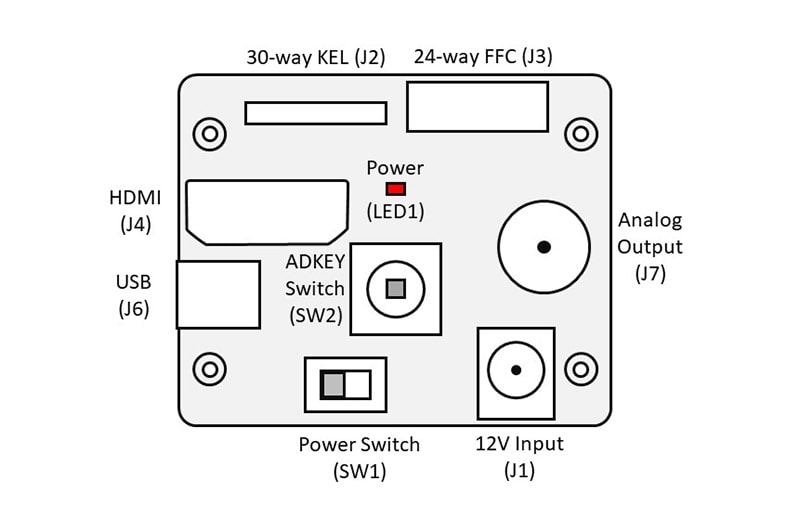
Harrier 18x HDMI 4K Camera Evaluation Board Features
| Power (J1) | Power is supplied to the Harrier 18x HDMI 4K Camera Evaluation Board by the 12V power supply via a barrel connector (J1). This supply is also used as a power supply for the camera and is connected to the camera via the Power Switch (SW1). When the Power Switch (and camera power supply) is switched ON the Power (LED1) will illuminate. |
| KEL30 connector (J2) | The evaluation board is fitted with a 30-way micro coaxial cable connector (J2) to link to the matching connector on the camera (J301). Connector type: KEL USL00-30L. A KEL 30-way micro coaxial cable (USL20-30SS-***-C) is included in the evaluation kit. |
| FFC24 connector (J3) | The evaluation board is fitted with a 24-way FFC connector (J3) to link to the matching connector on the camera (J302). A 24-way FFC cable is included in the evaluation kit. |
| HDMI connector (J4) | Connector for HDMI camera output. The protective insert needs to be removed from the HDMI socket (J4) before use. With a suitable HDMI cable, connect the evaluation board to a HDMI monitor/display. If you intend to use 4K, the monitor and cable will need to be able to support 4K video. |
| UART Connector (J5) | This 4-way header connector (Yeonho 12505WR-04) gives access to the camera serial interface. Pin 2=TX, Pin 3=RX, Pin 4 = GND. |
| USB connector (J6) | The mini-USB socket (J6) on the evaluation board enables VISCA communications with the camera. Connect the USB connector J6 with the USB Type-A to mini USB Type B cable, supplied in the evaluation kit to connect to a PC. The VISCA interface will appear as a COM port on the PC and be accessible to PC software; this COM port can be used with the HarrierControl command line software, or other serial control applications, to communicate with the camera. The HarrierControl application can be downloaded from the Software page. |
| Analog output (J7) | The evaluation board is fitted with a BNC socket (J7). For capturing analog camera output connect the BNC socket J7 to an analog monitor/display using a suitable coaxial cable. |
| Power Switch (SW1) | Power switch to turn on or off power for the evaluation board. When the Power Switch is switched ON the Power (LED1) will illuminate and the camera will be powered. |
| ADKEY Control Switch (SW2) | This navigation switch can be used to manually control the zoom/focus of the camera, or to operate the camera on on-screen menu system. The control has 5 positions that can be operated – UP, DOWN, LEFT, RIGHT, MENU SELECT. The switch position names represent the way to move the switch from the perspective of the camera display when the evaluation board is mounted on the back of the camera. MENU SELECT is chosen by pressing the lever towards the evaluation board. By default, the on-screen menu system is off; pressing MENU SELECT will open the menu system and the other switch positions can be used to move the highlighted menu option to navigate through the menu system. For more information on the menu system please see the camera technical reference manual. |
| Power LED (LED1) | This LED will light up when the power switch is turned on and the evaluation board is connected to a 12V power supply. |
| Download | File Type | File Size | |
|---|---|---|---|
Manuals & Quick Start Guides |
Harrier 18x HDMI 4K Camera Quickstart Guide - v1.0.1 | 659.15 KB | |
Software |
HarrierControl Camera Software v.1.3.2 | N/A | N/A |
Other Downloads |
Harrier 18x HDMI 4K AFZ Camera evaluation board schematics | 90.39 KB | |
| List of available documentation | 180.38 KB |
| Part number | Description |
|---|---|
| AS-CAM-18HDMI4K-EVAL-A |
Evaluation kit for the Harrier 18x HDMI 4K Camera. Kit contains evaluation board, power supply, KEL cable, USB cable and mounting screws/pillars. |
| AS-CAM-18HDMI4K-A |
Harrier 18x AF-Zoom HDMI 4K Camera. |

The evaluation board mounted on a Harrier 18x AF-Zoom HDMI 4K Camera
Related Products
View Product
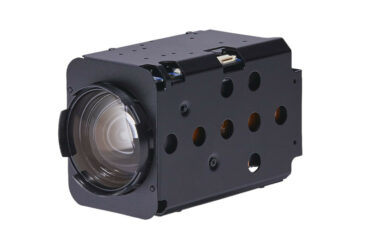
Harrier 18x AF-Zoom HDMI 4K Camera
View Product